Connect to the Wider Internet
Contents
本篇博客记录本人使用 Shadowsocks (以下简称 SS) 搭.建.梯.子.的过程。敏感内容用英文以防止被和谐。整体思路是:(1)购买国外服务器 (Proxy Server);(2) SSH 登录管理(运行 SS);(3) 客户端连接出墙。

1. Proxy Server
SS is based on a technique called proxying. First we connect to a computer other than our own. This other computer is called a proxy server. When we use a proxy, all our traffic is routed first through the proxy server, which could be located abroad.
1.1 Buy Vultr products
有很多 Proxy server 提供选择,本人用的是 Vultr。Here is the Vultr web. Refer to 中文-Vultr新手用户注册及购买图文教程,支持支付宝。 Recommend selecting server in European nations.
Vultr 按时间收费,最基本费用 6 $/mon,即开即用,即关即停。如果遇到下面 IP 被墙的问题,可以 Destory server,重新选择产品。
2020/03/13,放弃 Vultr,转用 Hotwinds。该服务按月收费,最基础费用折后 4.5 $/mon. 支付宝支付会遇到人工审核,pending 状态比较久,建议用 VISA 支付。详细内容见:
・2020年搬瓦工、Vultr、DigitalOcean等国外VPS被封解决办法
・美国VPS Hostwinds IP被屏蔽Ping不通解决新方法 - 免费换IP
1.2 Test if ip works
The Great Firewall(GFW) is quite powerful, which may identify and block traffic your ip address from the proxy server. Test whether your IP address works.
# Suppose that below is the server information
Location:   Paris
IP Address: 96.003.028.004
Username:   root
Password:   •••••••
终端检测:$ ping 96.003.028.004;如果长时间未响应,说明 IP 被墙了。
网页检测:进入 https://tools.ipip.net/ping.php ,顶部输入 96.003.028.004, 选择 中国,然后点击 ping,如果丢包率都是 100,说明 IP 被墙了。或者进入 http://ping.chinaz.com/95.179.212.134 ,输入 96.003.028.004 后,如果响应时间都显示超时,说明 IP 被墙。
1.3 Login proxy server
$ ssh root@96.003.028.004
More Details about SSH ,please refer to my another blog Login sever with ssh.
2. Run SS server
有两种方法运行 SS 服务端,第一种利用 Docker 的 SS 镜像 (2.1 Docker+SS),第二种直接安装 SS 服务器端 (2.2 SS server)。
2.1 Docker+SS
Docker 容器避免了 SS server 的安装过程及可能遇到的环境问题。只需要从 Github 上 pull 已有的 docker-shadowsocks 镜像,然后 run,就可以运行 SS 服务端。Docker 更多信息见 Docker study note。
2.1.1 Install Docker Engine
2.1.1.1 Ubuntu
# 1. Update the apt package index.
$ sudo apt-get update

# 2. Install the latest version of Docker Engine - Community and containerd.
  Or go to the next step to install a specific version:
$ sudo apt-get install docker-ce docker-ce-cli containerd.io

# 3. To install a specific version of Docker Engine - Community, list the available versions in the repo, then select and install:
# a. List the versions available in your repo:
$ apt-cache madison docker-ce

# b. Install a specific version using the version string from the second column, for example, 5:18.09.1~3-0~ubuntu-xenial.
$ sudo apt-get install docker-ce=<VERSION_STRING> docker-ce-cli=<VERSION_STRING> containerd.io

# 4. Verify that Docker Engine - Community is installed correctly by running the hello-world image.

$ sudo docker run hello-world

# This command downloads a test image and runs it in a container. When the container runs, it prints an informational message and exits.
2.1.1.2 CentOS
# 1. Install the latest version of Docker Engine - Community and containerd, or go to the next step to install a specific version:
$ sudo yum install docker-ce docker-ce-cli containerd.io
# If prompted to accept the GPG key, verify that the fingerprint matches 060A 61C5 1B55 8A7F 742B 77AA C52F EB6B 621E 9F35, and if so, accept it.

# Docker is installed but not started. The docker group is created, but no users are added to the group.

# 2. To install a specific version of Docker Engine - Community, list the available versions in the repo, then select and install:
# a. List and sort the versions available in your repo. This example sorts results by version number, highest to lowest, and is truncated:
$ yum list docker-ce --showduplicates | sort -r

# The list returned depends on which repositories are enabled, and is specific to your version of CentOS (indicated by the .el7 suffix in this example).
# b. Install a specific version by its fully qualified package name, which is the package name (docker-ce) plus the version string (2nd column) starting at the first colon (:), up to the first hyphen, separated by a hyphen (-). For example, docker-ce-18.09.1.
$ sudo yum install docker-ce-<VERSION_STRING> docker-ce-cli-<VERSION_STRING> containerd.io
# Docker is installed but not started. The docker group is created, but no users are added to the group.

# 3. Start Docker.
$ sudo systemctl start docker

# 4. Verify that Docker Engine - Community is installed correctly by running the hello-world image.
$ sudo docker run hello-world
# This command downloads a test image and runs it in a container. When the container runs, it prints an informational message and exits.
2.1.2 Pull and Run SS image
# 1. 拉取镜像:
$ sudo docker pull oddrationale/docker-shadowsocks

# 查看镜像:
$ sudo docker images

# 2. 运行:
$ sudo docker run -d -p 2018:1996 oddrationale/docker-shadowsocks -s 0.0.0.0 -p 1996 -k woaiqiangge -m aes-256-cfb

-d 允许 docker 常驻后台运行
-p 来指定要映射的端口,可自由设置,格式是 hostPort:containerPort
-s 0.0.0.0 或者 127.0.0.1
-k 设置你的的密码
-m 指定加密方式 aes-256-cfb

# 3. 查看运行状态:
$ sudo docker ps -a
如若看到 oddrationale/docker-shadowsocks 行状态(status)为 `up xx seconds`。证明已经运行。
2.2 SS server
# 使用 Pip 作为管理软件对 SS 进行管理
$ curl https://bootstrap.pypa.io/get-pip.py -o get-pip.py
$ python get-pip.py

# 安装 SS
$ pip install shadowsocks
......
Successfully installed shadowsocks-2.8.2
# 配置 SS,编辑一个新文件
$ sudo vi /etc/shadowsocks.json
# 粘贴下面内容:
{
    "server":"0.0.0.0",
    "server_port":2019,
    "local_address":"127.0.0.1",
    "local_port":1080,
    "password":"woaiqiangge",
    "timeout":600,
    "method":"aes-256-cfb"
}
# 上面的 server_port 是服务器端口,password 是密码,可以自己修改。
# 将shadowsocks加入系统服务
$ sudo vi /etc/systemd/system/shadowsocks.service
# 粘贴下面内容:
[Unit]
Description=Shadowsocks
[Service]
TimeoutStartSec=0
ExecStart=/usr/local/bin/ssserver -c /etc/shadowsocks.json
[Install]
WantedBy=multi-user.target
# 上面的 ExecStart 一行中 sssever 路径可能有差别,可自行 ls 查看是否存在
# 设置开机自启命令
$ sudo systemctl enable shadowsocks

# 启动命令
$ sudo systemctl start shadowsocks

# 查看状态命令
$ sudo systemctl status shadowsocks
# 如果没有报错证明成功
3. SS client
这部分尽量详细,非小白请绕路。在此之前,确保有已经运行的 SS 服务供 SS 客户端连接。上述步骤都是自己搭建 SS 服务的过程;除此之外,朋友提供,或其他途径购买的,都无非是如下示例的信息:
# 必须
server:        96.003.028.004 # 外网ip
server port:   2019           # 端口
password:      woaiqiangge    # 密码
method":       aes-256-cfb    # 加密方式

# 非必须
local address: 127.0.0.1
local port:    1080
大致思路是,到 Github Shadowsocks 下载安装 SS 客户端( github 服务器因为在国外,速度比较慢),填写配置信息,配置电脑或浏览器(仅 PC 端),成功上外网。
3.1 Android
有条件上外网的,可以到 Google Play 下载,或者到 Github 上下载最新安装包。
安装以后,配置请参考这篇博客 https://bwgbus.com/554.html/ .
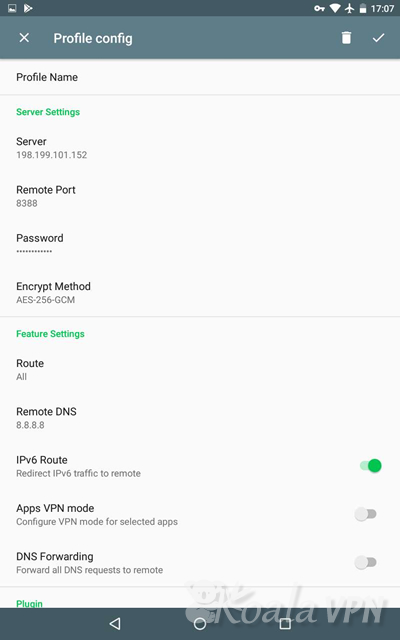
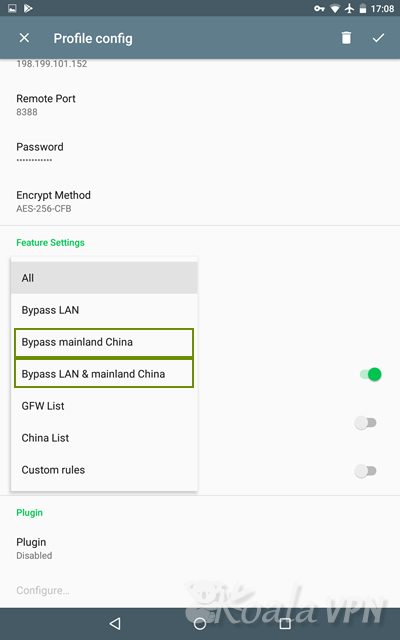
进阶:When you cannot connect to a specific website, change this setting.
Route: Usually set the following:
. Bypass mainland China: VPN server is used to connect only to restricted websites.
. Bypass LAN & mainland China: VPN server is used for websites in countries other than China.
. GFW list: Great Firewall list. (Recommend)
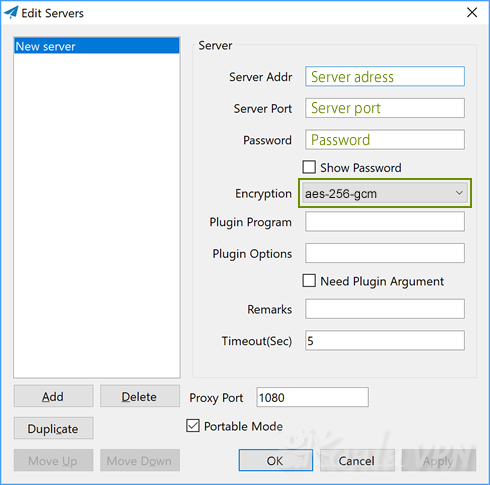
3.2 Windows
Download and unzip Shadowsocks-windows,参考博客 http://16bing.com/2017/03/23/pc-shadowsocks/ 进行配置。
3.2.1 Global and PAC mode
PAC mode means Connection to websites restricted by China is made via the VPN server, while Global modes allow All connections to be made via the VPN server.
Read more 关于代理模式PAC和全局模式的区别.
3.2.2 Chrome SwitchyOmega
当部分国外网站不走 PAC 代理,无法起到加速效果,甚至无法访问时,Chrome 浏览器代理插件 Proxy SwitchyOmega 可解决此问题。
安装 SwitchyOmega :在 Chrome 应用商店 在线安装。如果无法从该链接安装,去 Github 下载最新版安装包,然后在 Chrome 地址栏输入 chrome://extensions 打开扩展程序,拖动 .crx 后缀的 SwitchyOmega 安装文件到扩展程序中进行安装。
配置 SwitchyOmega :参考博客 https://www.kancloud.cn/leviio/chrome-use-skill/229094.
另外,Firefox 或基于 Mozilla 的浏览器也有相同功能的插件,感兴趣可自行搜索。
3.3 Linux
Linux 下有终端启动 (3.3.1 sslocal) 和图形界面 (3.3.2 shadowsoks-dt5) 两种方式。SS client 启动成功不代表可以上外网,仍然需要配置全局模式或设置浏览器。
3.3.1 sslocal
Linux 安装 SS client 与 SS server 步骤相同:
# 使用 Pip 作为管理软件对 SS 进行管理
$ curl https://bootstrap.pypa.io/get-pip.py -o get-pip.py
$ python get-pip.py

# 安装 SS
$ pip install shadowsocks
......
Successfully installed shadowsocks-2.8.2

# 配置 SS,编辑一个新文件
$ sudo vi /etc/shadowsocks.json
# 粘贴下面内容:
{
    "server":"96.003.028.004",
    "server_port":2019,
    "local_address":"127.0.0.1",
    "local_port":1080,
    "password":"woaiqiangge",
    "timeout":600,
    "method":"aes-256-cfb"
}
# server 和 server_port 分别是 SS server 购买的 ip 和前面配置的 Server_port
# local_address 和 local_port 不用修改
# password 和 method 要与前面配置的内容一致

# 启动 ss 客户端
$ sudo sslocal -c /etc/shadowsocks.json
# 看到有信息输出,证明启动成功

# 后台运行
$ sudo sslocal -c /etc/shadowsocks.json -d start
# 关闭运行
$ sudo sslocal -c /etc/shadowsocks.json -d stop
3.3.2 shadowsoks-dt5
# 本人系统:Ubuntu 16
# 添加ppa源
$ sudo add-apt-repository ppa:hzwhuang/ss-qt5

# ppa:hzwhuang/ss-qt5 并没有 ubuntu18+ 的源
# 对于 系统ubuntu18+,需要修改 /etc/apt/sources.list.d/hzwhuang-ubuntu-ss-qt5-bionic.list
# 将里面的 bionic 改成 xenial

$ sudo apt-get update
$ sudo apt-get install shadowsocks-qt5


# 在系统应用里搜索 ss-qt5 点击打开,或终端打开:
$ sudo ss-qt5

# connection->add -> Mannally,添写内容和前面类似
# 显示 connected 后配置全局模式或者浏览器
3.3.3 终端上网
# 1. 安装 proxychains

$ sudo apt install proxychains

# 2. 编辑配置文件

$ sudo vi /etc/proxychains.conf

# 在最后一行加上
socks5 127.0.0.1 1080

# 3. 注销重新登录

# 4. 在命令前加上 proxychains 测试

$ proxychains curl www.google.com

# 如果遇到错误

ERROR: ld.so: object 'libproxychains.so.3' from LD_PRELOAD cannot be preloaded (cannot open shared object file): ignored.

# 解决办法:

$ find /usr/ -name libproxychains.so.3 -print

$ sudo vim /usr/bin/proxychains

# 将 find 后面的路径写在 EXPORT LD_PRELOAD= 后面

# 5. 不加 proxychains 测试

$ curl www.google.com
3.3.4 Polipo 实现全局代理
为了让整个系统都走 SS 通道,需要配置全局代理,可以通过 polipo 实现:
# 安装 polipo
$ sudo apt-get install polipo

# 修改polipo的配置文件 /etc/polipo/config
logSyslog = true
logFile = /var/log/polipo/polipo.log

proxyAddress = "0.0.0.0"
socksParentProxy = "127.0.0.1:1080"
socksProxyType = socks5

chunkHighMark = 50331648
objectHighMark = 16384

serverMaxSlots = 64
serverSlots = 16
serverSlots1 = 32

# 重启polipo服务
$ sudo /etc/init.d/polipo restart

# 为终端配置http代理
$ export http_proxy="http://127.0.0.1:8123/"

# 测试能否翻墙
$ curl www.google.com
# 如果有响应,则全局代理配置成功。
- 浏览器设置请见前文( 3.2.2 Chrome SwitchyOmega ).
4. Additional Notes
・特殊时期,port 被封的厉害,最近(2020/03)几乎一天一改,修改的端口值两次之间最好差距大一点。推荐修改的端口:22(提前把 ssh 端口改到其他端口)/80/443/3306/3389/6379 此类常见端口 (最危险反而最安全心理),以及10000以上的端口。
・Juicessh,一款安卓版的 SSH 工具,不需要每次打开电脑改设置。
・进阶操作:shadowsocks 优化。
・进阶操作:ShadowsocksR服务端伪装成正常网站流量,以更好的欺骗流量匹配
・2020/01/31 在 ubuntu20 中安装 ss,参考 Ubuntu下源码编译安装最新版Shadowsocks-Qt5 。需注意 ubuntu20 和 ubuntu16, 18 版本号的差异;其中 apt-get install 提示缺失安装包出错可忽略,等编译时出错再解决。
5. Additional References
・Ubuntu 16.04服务器上搭建Shadowsocks服务
・Ubuntu server命令行配置shadowsocks全局代理
・Koala VPN: http://koala-ss.com/howto/win_ss.html; http://koala-ss.com/howto/android_ss.html
Author Qiang
LastMod 2020-03-12